How to Build a Productivity Application in React: Part 2
Claire Sinozich
4 Apr 2019
•
4 min read
In my last article, aptly named How to Build a Productivity Application in React: Part 1, I laid out how to create a react app using the also aptly named Create React App from Facebook, and yarn for setting up our development server. I also walked through how to create a to-do list in React using functional and class components, and how to add items to that to-do list using state.
In this second part of the series, I’m going to explain how to mark items as complete and remove completed items. The starting code for this portion of the tutorial can be found in the GitHub Repository here.
This series is for my edification as much as it is yours, so please don’t hesitate to let me know if I’ve gotten something wrong, or ask questions. And with that, let’s dive in!
Marking Items as Complete
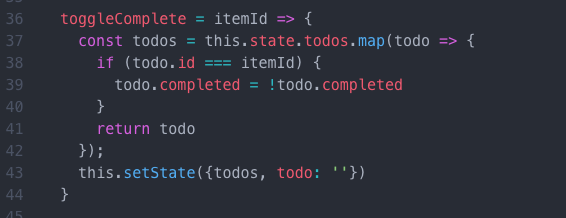
Our first step in this portion of the tutorial is to toggle the boolean complete from our todos array between true and false. As I’m handling all of my state inside of my App.js file, this is where I’ll place a toggleComplete() method.
This toggleComplete() method will take a unique identifier (here called itemID) as an argument, and then map over our todos array, checking each id in our todo object against the itemID. If the identifiers are the same, we set the completed value on the todo object to the opposite of what it currently states, e.g., if todo.completed is true, this will set todo.completed to false, and vice versa. This is what allows us to toggle the completed boolean.
However, if the identifiers do not match, the todo object is returned unchanged. Now, we set our constant of todos (line 37) declared within toggleComplete() on the state using our this.setState() method, followed by resetting the todo object back to an empty string.
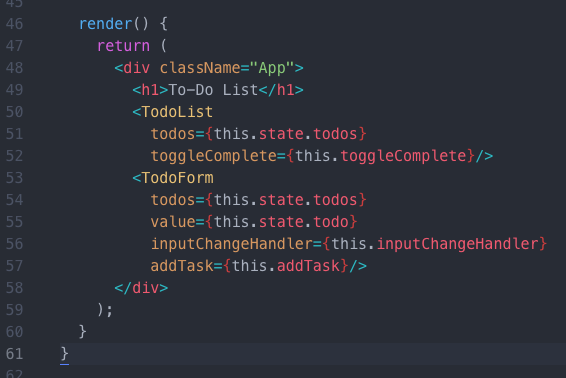
Now, let’s pass our toggleComplete() function down to our TodoList component in App.js:
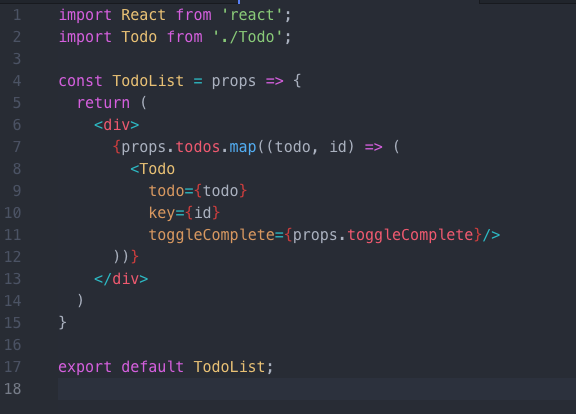
Let’s go one step further and pass toggleComplete() down to our Todo component in the TodoList.js file:
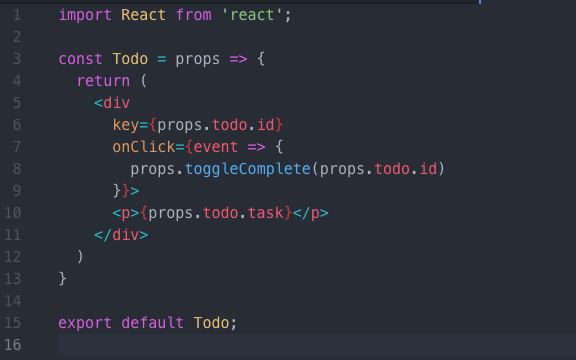
And last but not least, we’ll actually give our toggleComplete() method to each one of our Todo components in our Todo.js file:
Using your React Dev Tools to View Your Work
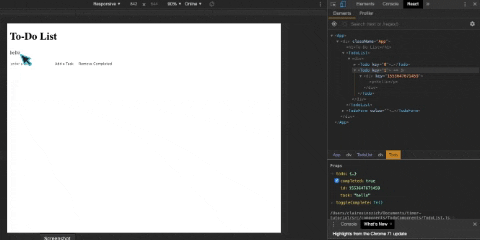
Voila! You can toggle your completed value by clicking on each task in your to-do list. Wait, what’s that? It’s not working? Actually, it is! Unfortunately, we haven’t added any styles to our application at all, so there’s no difference in what you see when you click on a task. And, since we haven’t added the remove functionality yet, it’s even harder to see.
If you’d like to see this toggle function in action, head over to your [React Dev Tools] (https://chrome.google.com/webstore/detail/react-developer-tools/fmkadmapgofadopljbjfkapdkoienihi?hl=en) in Chrome. Open up your application, and in your TodoList component, you’ll find your Todo component you’ve added to the screen. If you look at the Props that say todo{…} in your Todo tab at the bottom, you’ll be able to see the prop completed toggle on and off as you click on your todo. This will be easier to see when we get to styling our application later.
Removing Completed Items
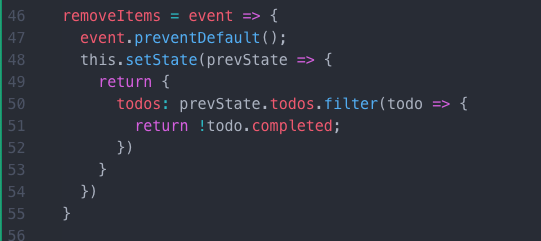
Let’s jump back into our App.js file to add another method to our App class. Here, I’ve called the method removeItems, and it will take a click event as an argument. We’ll add the click event to our Remove Completed button here shortly.
Inside our removeItems function, we’ll want to start by using our built-in method, event.preventDefault(), which like in our addTask function, will prevent the button from refreshing the server every time you click it.
Afterward, we’re going to set state by using a callback function. This callback function will allow you to check prevState, or the most recent iteration of state (read more about using state and previous state [here] (https://css-tricks.com/understanding-react-setstate/)). prevState exists in opposition to the original state, declared in your App’s constructor function.
Basing our setState() off of our prevState (line 48), we then want to return (line 49) a new array of todos (line 50). This new array of todos will be built using our .filter() method, in which the function checks each of the todo items in the todos array for whether or not completed is listed as true or false. In line 51, we’re seeing all of the items where completed is false (based on prevState) being returned to the todos array. This todos array is then being set on state (line 48), providing you with a list of tasks in your application that have not been completed.
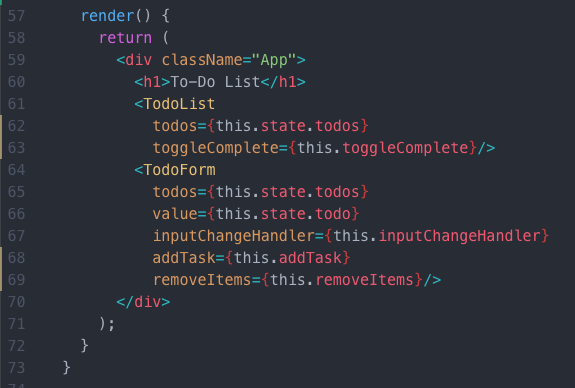
Now, lets hand this removeItems() function down to our TodoForm component in our App:
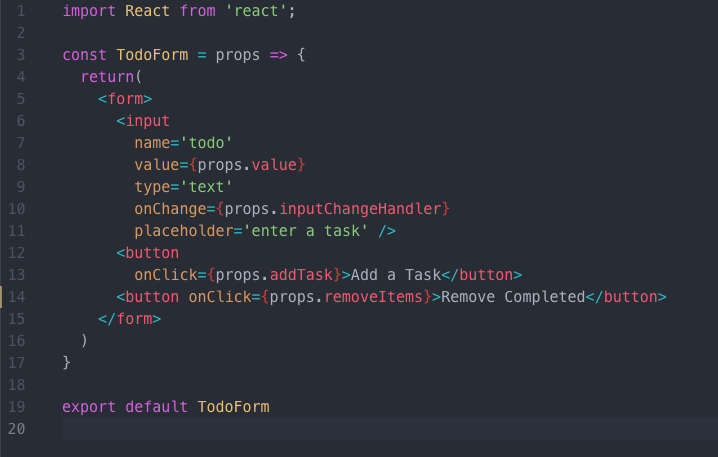
Then, add removeItems as an onClick to our Remove Completed button in the TodoForm component:
And there we go! You can now remove completed items from your list. Again, this will be slightly difficult to see until we get to styling our application. But, go ahead and try it out! Your application should be working smoothly by now.
This is Part 2 in a tutorial series on how to create a Productivity Application in React. Check out Part 1 here, and look out for Part 3, adding our data to local storage, soon!
WorksHub
Jobs
Locations
Articles
Ground Floor, Verse Building, 18 Brunswick Place, London, N1 6DZ
108 E 16th Street, New York, NY 10003
Subscribe to our newsletter
Join over 111,000 others and get access to exclusive content, job opportunities and more!
